
Introduction
One of the most common questions I get from customers is: how do I paint this? 3D printed parts — whether resin or PLA — behave differently from injection-moulded plastic, and if you approach them the same way you might end up with peeling paint, poor adhesion, or a finish that doesn’t look right.

The good news is that with the right preparation and a few key techniques, 3D printed parts respond extremely well to painting and weathering. In many ways the layer texture and surface detail of a well-printed part holds weathering effects better than smooth plastic.
This guide covers everything from surface preparation through to final weathering effects, with specific notes on the techniques that work best for industrial and steel mill loads. You will learn how to paint and weather 3D printed model railroad parts.
All ScaleRail3D parts are designed with painting in mind. The surface detail — gear teeth, weld lines, rivet heads, wood grain on cradles — is there to catch paint and hold weathering. The techniques below are what I use on my own models for the Trenton layout.
Step 1: Surface Preparation
Cleaning the Part
Before any paint goes on, the part needs to be clean. Resin parts in particular can have residual release agents or surface oils from handling that will cause paint to bead or peel.
For resin parts: wash in warm soapy water with a soft brush, rinse thoroughly, and allow to dry completely — at least an hour, or overnight to be safe.
For PLA filament parts: a quick wipe with isopropyl alcohol (IPA) on a cotton pad is sufficient. Allow to evaporate fully before priming.
Priming — The Most Important Step
Do not skip priming. Paint applied directly to resin or PLA without a primer will often not adhere properly and will chip or peel with handling. A good primer bonds to the material and gives subsequent paint layers something to grip.
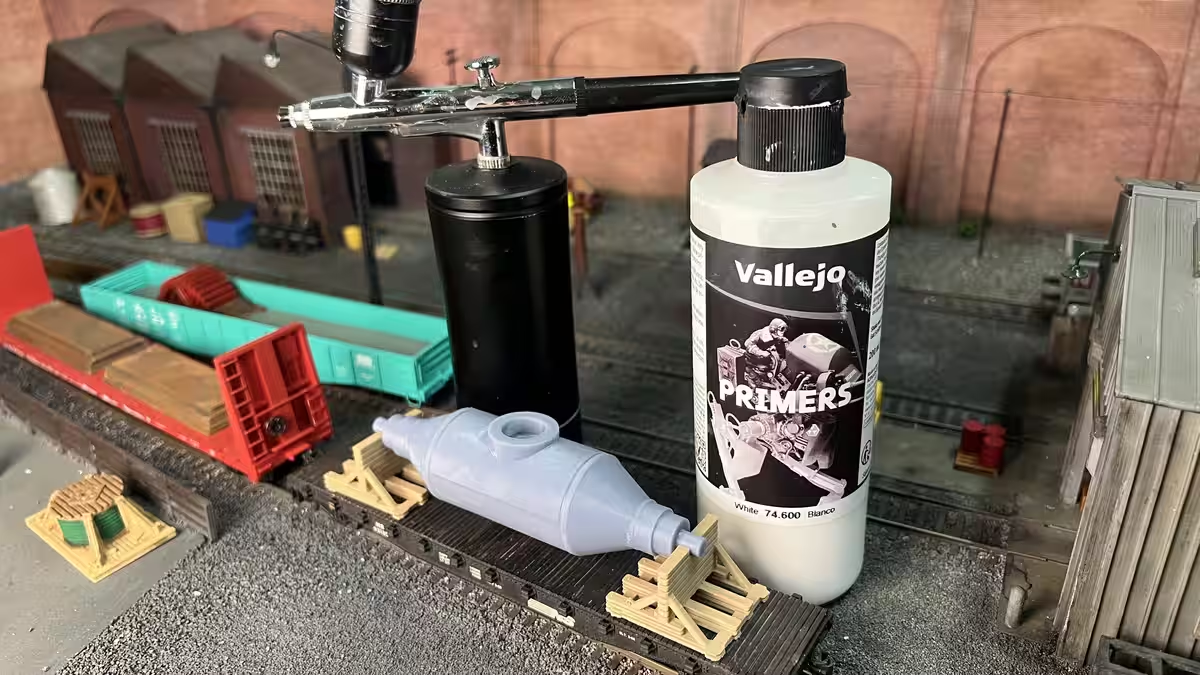
Recommended primers:
- Vallejo Surface Primer (brush or airbrush) — excellent adhesion on both resin and PLA
- Tamiya Fine Surface Primer in a rattle can — fast and reliable for larger parts
- Rust-Oleum 2X Paint + Primer in flat grey or black — good budget option for larger pieces
Colour choice for primer matters. For industrial and steel mill loads, prime in dark grey or black. This gives you a natural shadow tone in recesses and means you’re working light over dark — which produces more convincing depth than light over white.
Pro Tip: For parts that will end up looking like heavily rusted steel, prime in a dark brown-red (like Rust-Oleum Rusty Metal Primer). This colour naturally appears in deep recesses even after subsequent layers, enhancing the rust effect without extra work.
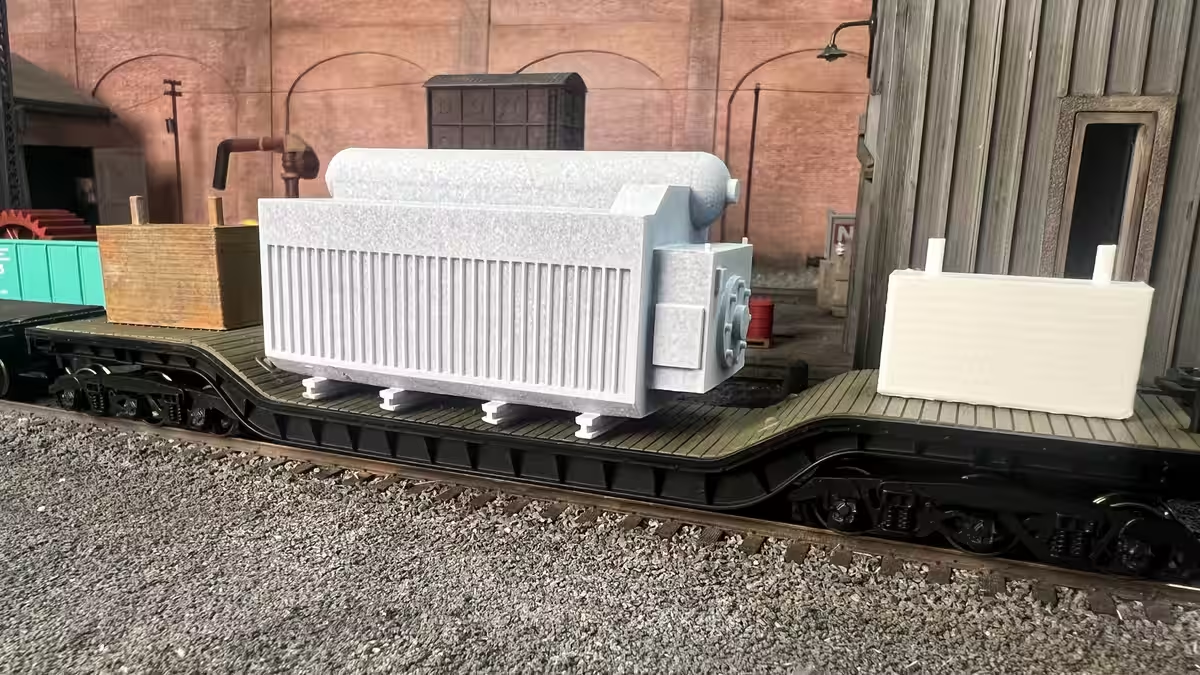
Step 2: Base Coating
Steel and Metal Parts
Most industrial loads start with a steel base — machinery, ladles, gears, furnace components. For these, a flat mid-grey or dark steel colour applied over your dark primer creates a convincing raw metal appearance.
Good base colours for steel:
- Vallejo Model Color 70.869 Basalt Grey
- Citadel Leadbelcher (metallic — use sparingly, more effective as a highlight than a base)
- Any flat dark grey hobby paint — the brand matters less than the finish (always flat, never gloss at this stage)
Apply the base coat thinly. You want the dark primer to show through slightly in the recesses — this is doing your shadow work for you. Two thin coats are better than one heavy coat.
Wooden Cradles and Blocking
Transport cradles and timber blocking on flat car loads should read as weathered wood, not fresh lumber. Start with a mid-brown base — raw umber, tan, or a dedicated ‘wood’ colour from your hobby range.
ScaleRail3D cradles printed in wood-fibre filament already have a natural wood texture in the surface. These take a brown wash extremely well and need minimal additional work to look convincing.
Ready to Run Parts
ScaleRail3D’s Ready to Run range uses iron-infused PLA filament, which produces genuine surface oxidation during printing. These parts don’t need painting — but they do benefit from a clear matt varnish coat to protect the surface, and optional grime washes to add depth. See the weathering section below.
Step 3: Rust and Oxidation Effects
Rust is the defining weathering effect for steel mill loads. Real industrial equipment accumulates rust quickly — especially components that are handled outdoors, exposed to heat, or left sitting between uses.
Sponge Stippling — The Core Technique
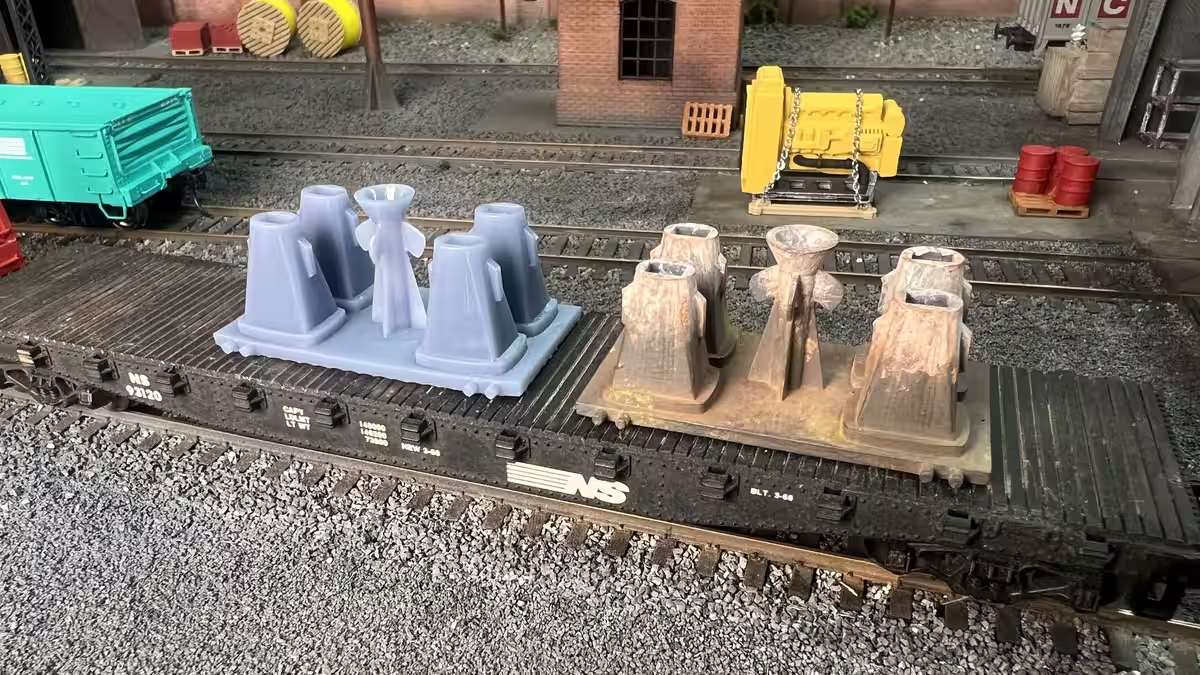
Sponge stippling produces organic, randomised rust patches that look far more convincing than painted-on rust. Tear a small piece from a blister pack foam or kitchen sponge — the irregular torn edge is what creates the random pattern.
- Dip the sponge corner lightly in rust-coloured paint (orange-brown, like Vallejo Rust or Games Workshop Doombull Brown)
- Dab most of the paint off on a paper towel — you want very little paint on the sponge
- Lightly stipple onto the part, focusing on edges, corners, and flat exposed surfaces
- Repeat with a darker rust tone (deep brown) in the same areas for depth
- Add a third pass with a lighter orange in the centres of larger rust patches
The key is building up gradually. Three thin passes of sponge stippling looks far more realistic than one heavy application.
Rust Run-Down Streaks
Rust streaks running downward from bolt heads, rivets, and joints add another layer of realism. These are best applied with a thin brush and highly thinned paint — almost a wash consistency — drawn downward from the rust source point.
Alternatively, brown/rust-coloured weathering pencils (Prismacolor or Derwent) applied dry and then blended with a barely-damp brush produce excellent streak effects with very precise control.
Pro Tip: Look at reference photos of real industrial equipment and railcars when deciding where to place rust. Rust appears first at welds, rivets, scratches, and anywhere water pools or runs. Flat top surfaces rust faster than vertical faces.
Step 4: Washes for Depth and Grime
A wash is thinned paint applied over the whole part that flows into recesses and darkens detail. It’s one of the most effective techniques in scale modeling and works particularly well on 3D printed parts because the layer lines and surface texture give the wash something to pool in naturally.
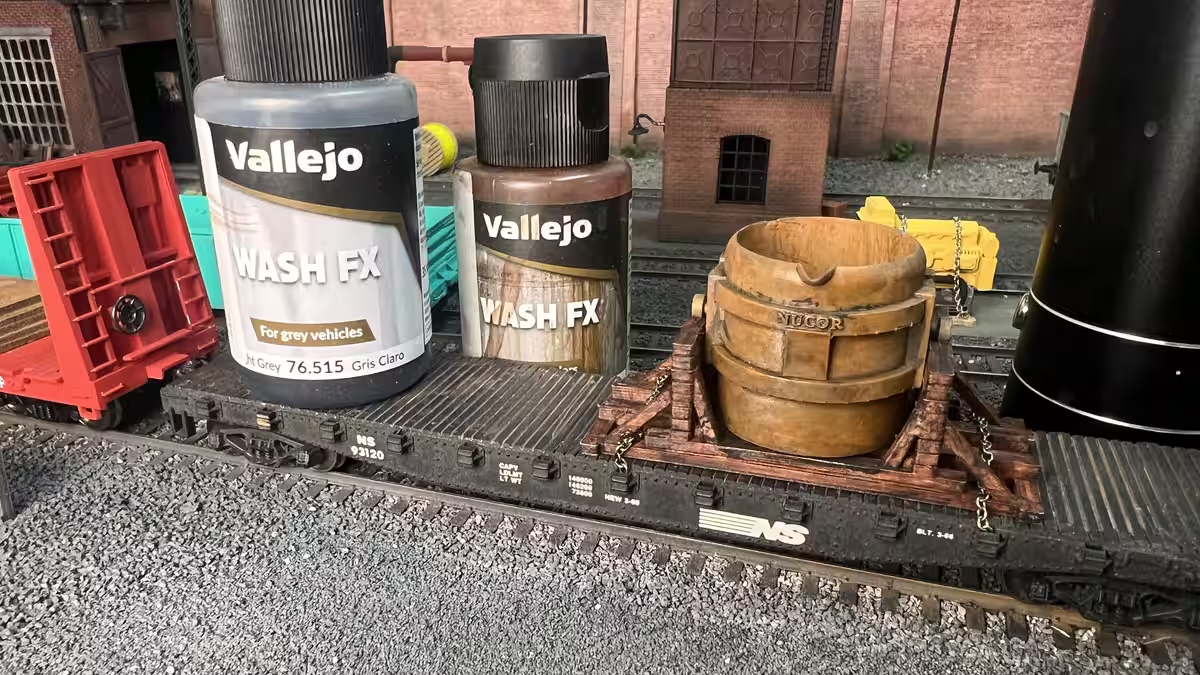
Basic Oil and Grime Wash
Mix a small amount of dark brown, black, or raw umber paint with water or dedicated wash medium until it’s very thin — roughly the consistency of ink. Apply it generously over the whole part with a wide brush, then use a clean damp brush to remove excess from flat surfaces, leaving it pooled in recesses.
For steel mill loads, a brown-black grime wash applied after your rust work ties everything together and represents the grease, oil, and industrial residue that accumulates on working equipment.
Ready-Made Washes
If you prefer a ready-made solution, the following products work well on 3D printed parts:
- Citadel Agrax Earthshade — warm brown, excellent all-purpose grime wash
- Citadel Nuln Oil — dark grey-black, good for fresh steel and machinery
- Vallejo Model Wash Dark Brown or Dark Grey — purpose-made, excellent flow
- AK Interactive Rail Wash — specifically formulated for railroad weathering
Step 5: Dry Brushing for Highlights
Dry brushing is the technique of applying a small amount of lighter paint to a nearly-dry brush and lightly dragging it across raised surfaces. It deposits paint only on the highest points of the detail, creating a worn, highlighted effect that reads as metal-on-metal wear or dust accumulation.
For steel parts: dry brush with a light steel or silver over the base coat and rust work. Focus on gear teeth, raised rivet heads, and any surface that would receive handling wear.
For wooden cradles: dry brush with a pale tan or off-white to represent sun-bleached and worn wood grain.
Use a stiff, flat brush — an old brush with the tip cut flat works well. Load it with paint, wipe almost all of it off on a paper towel until almost no paint transfers, then lightly stroke across the surface.
Step 6: Final Effects — Powders and Varnish
Weathering Powders
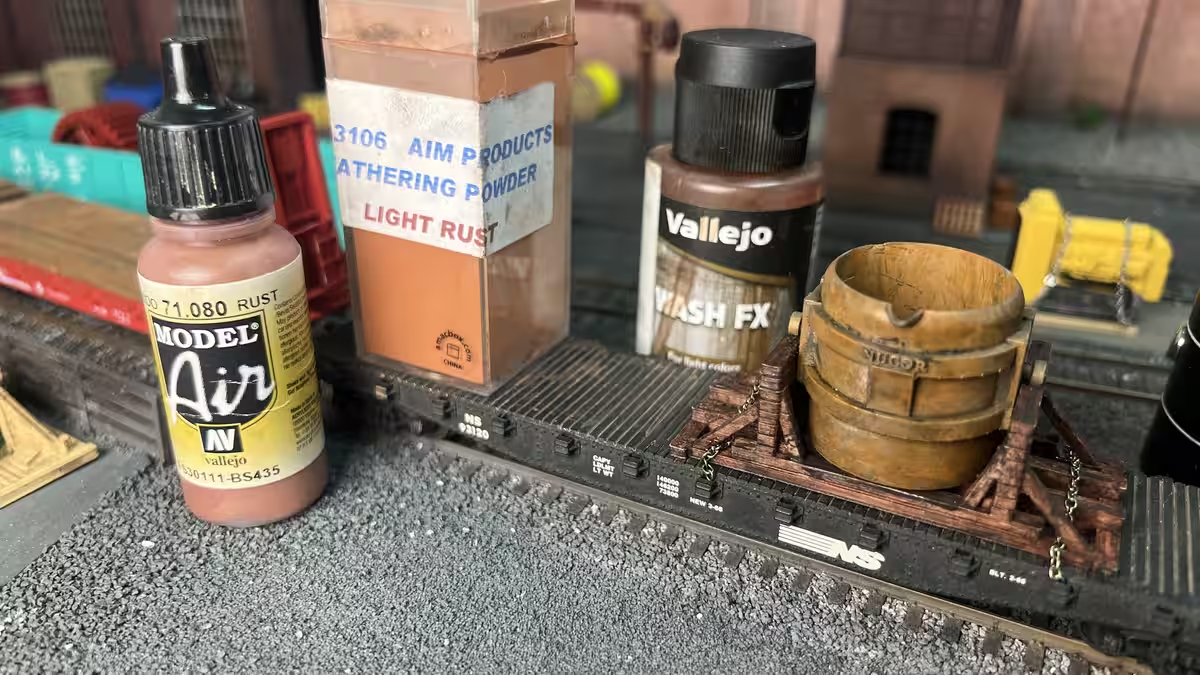
Weathering powders are finely ground pigments applied dry to a model surface. They’re perfect for final-stage effects and are particularly good for:
- Rust bloom — orange and brown powders applied to rusted areas intensify the effect
- Dust and dirt — buff, tan, and grey powders applied to the underside and lower sections
- Coal or soot — dark grey/black powders around exhaust points or heat-affected areas on furnace components
Apply powders with a soft brush after all paint is dry. Fix them in place with a light spray of matt varnish — but spray from a distance and very lightly, as heavy varnish will dissolve the powder effect.
Varnish — Always Finish Matt
Seal your finished work with a flat/matt varnish. This protects the paint and weathering, reduces any unwanted shine, and gives the part the correct scale appearance. Gloss varnish on a rusty steel load will look immediately wrong.
Recommended: Testors Dullcote rattle can, Vallejo Matte Varnish, or Citadel Stormshield. Apply in thin coats in a warm, dry environment.
For ScaleRail3D Ready to Run parts: skip painting and go straight to a light grime wash, optional rust powder, and a matt varnish coat. The iron-infused material already provides the base rust appearance — you’re just enhancing what’s already there.
Putting It All Together — A Quick Reference
Here’s the complete sequence for a typical steel mill load:
- Clean the part (wash resin, IPA wipe for PLA)
- Prime in dark grey or dark brown-red
- Base coat in flat steel grey
- Sponge stipple rust in 2-3 tones (dark brown, orange-brown, bright orange)
- Apply grime wash over entire part
- Dry brush light steel/silver on raised edges and wear points
- Add rust streaks with thinned paint or weathering pencil
- Apply weathering powders for final rust bloom and dust
- Seal with flat matt varnish
More Help
See the ScaleRail3D Painting Tips page for additional guidance specific to individual products in the range. If you have questions about a specific part or technique, get in touch via the contact page — I’m happy to help.
Browse our full Steel Mill Range Here
Browse the full range of unpainted HO scale loads here.
If you prefer a paint-free approach, the Ready to Run range uses specialist filaments to achieve realistic finishes straight out of the box. Ready to Run Range.
